

Why You Might Need a Light Switch Extension Plate
What is a Light Switch Extension Plate and Why is it Essential?
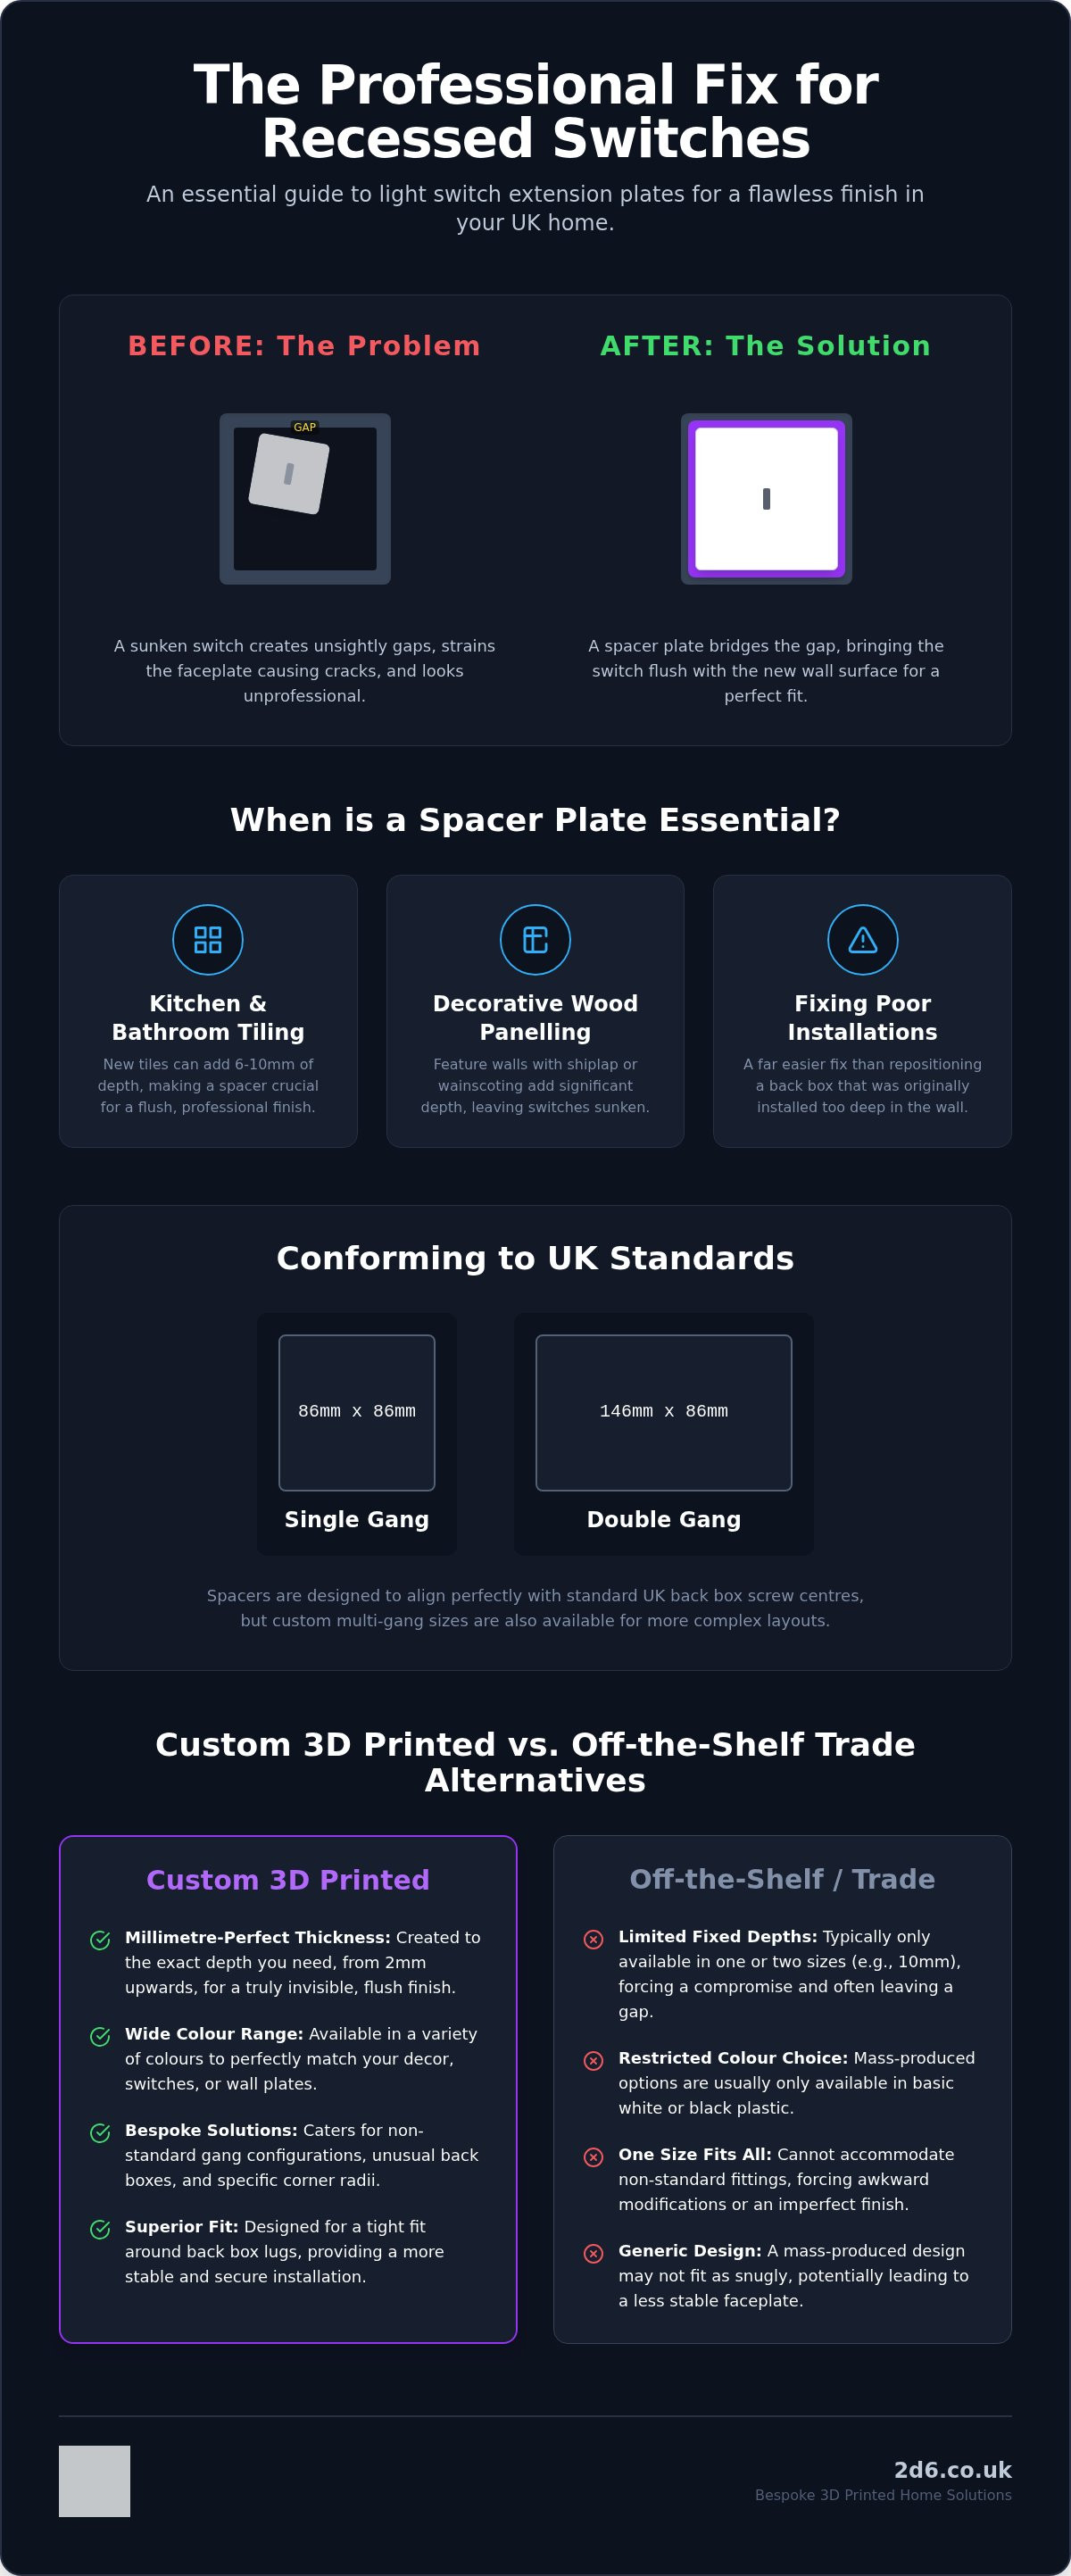
A light switch extension plate, often called a spacer or an extender, is a simple but brilliant solution for a common renovation headache. It is a frame, custom-made to a specific thickness, that sits neatly between your wall and the light switch faceplate. Its primary job is to solve the problem of recessed or sunken electrical back boxes, an issue that frequently occurs after adding a new layer to a wall surface.
Whether you have just fitted beautiful new tiles or installed stylish wood panelling, you may find your light switches and sockets no longer sit flush. This creates an unsightly gap and can lead to more serious problems. An extension plate bridges that gap, bringing the faceplate forward to sit perfectly level with the new wall surface. It is an essential component for preventing the faceplate from cracking under the strain of over-tightened screws trying to reach a deep-set box, and it provides a clean, professional finish by hiding any rough edges or gaps around the fitting.
Common Scenarios for Using a Spacer Plate
- Kitchen and Bathroom Tiling: Tiling is one of the most common reasons for a recessed back box. Even a slim tile can add 6mm to 10mm of depth, making a spacer essential for a flush finish.
- Decorative Wood Panelling: Feature walls using shiplap, wainscoting, or other panelling styles add significant depth, leaving switches looking sunken and unfinished without an extender.
- Fixing Poor Installations: Sometimes, during construction or a previous renovation, a back box is simply installed too deep into the wall. A spacer plate is a far easier fix than ripping out the wall to reposition the box.
The Problem with Recessed Electrical Fittings
Leaving a light switch recessed in the wall is more than just a cosmetic issue. It can lead to several practical problems that can affect both the safety and longevity of your electrical fittings. A gap behind the faceplate creates a perfect trap for dust, debris, and moisture, which is particularly undesirable in kitchens and bathrooms.
Furthermore, when you tighten the screws on a floating faceplate, you put immense structural strain on the plastic. This can cause it to crack or warp over time, damaging the switch mechanism inside. Aesthetically, a sunken switch undermines the quality of your renovation work, drawing the eye for all the wrong reasons and detracting from the otherwise flawless finish of your newly decorated room.
Understanding UK Standard Back Box Spacers and Sizes
In the United Kingdom, electrical fittings follow specific standards to ensure safety and compatibility. A light switch extension plate must conform to these standards to work correctly. The most common sizes for wall plates are single gang and double gang.
- Standard UK single gang plates typically measure 86mm by 86mm.
- Standard UK double gang plates measure 146mm by 86mm.
- Spacers are designed with screw holes that align perfectly with the standard screw centres on UK back boxes, ensuring a secure and stable fit.
- Crucially, the depth of the spacer should be chosen to precisely match the thickness of your new wall covering, eliminating any gaps.
Single Gang vs Double Gang Extension Plates
Identifying your gang size is straightforward. A single gang faceplate houses one switch (like a standard bedroom light switch), while a double gang faceplate houses two switches side by side. However, modern homes often have more complex arrangements. You might have three, four, or even more switches or sockets in a single unit for controlling different lighting zones or appliances.
Whilst single and double gang spacers are the most common, the rise of smart homes and custom electrical layouts has created a need for non-standard solutions. For these unique setups, you may need custom multi-gang faceplate spacers to ensure a perfect fit across the entire unit. It is also important to consider the corner radius of your faceplate. Some have sharp, square corners, while others are gently rounded. A matching spacer ensures the final look is seamless and integrated.

Why Millimetre-Perfect Thickness Matters
There is nothing more frustrating than buying a "standard" 10mm spacer only to find your new tiles are 7mm thick. This still leaves you with a 3mm gap or, conversely, a spacer that protrudes from the wall. This is the fundamental flaw with mass-produced solutions; they force you to compromise.
This is where custom 3D printing technology shines. It allows for the creation of spacers in precise increments, sometimes as small as 2mm. By choosing a spacer with the exact thickness you need, you can achieve a truly flush finish where the extension plate is virtually invisible. It becomes a seamless part of the installation rather than an obvious fix, preserving the clean lines and professional look of your renovation.
You can now design your perfect spacer using out new Build My Spacer tool at:
Comparing Custom 3D Printed Spacers with Trade Alternatives
When you need a light switch extension plate, your first thought might be to visit a large DIY retailer. However, trade alternatives often fall short when a perfect finish is the goal. Mass-produced spacers typically come in a very limited range of colours, usually just white, and are restricted to one or two fixed depths like 10mm.
- Mass-produced spacers often come in limited colours, usually just white or black.
- Custom 3D printed plates offer a wider range of colours to match your decor, from standard white to stylish metallics.
- Trade alternatives are restricted to fixed depths, which can lead to unsightly gaps or a protruding plate.
- Bespoke manufacturing ensures a perfect depth and a tight fit around the specific lugs of your back box for a more stable installation.
The Limitations of Big-Box Retailers
Large retailers like Screwfix or Amazon are built for volume, not variety. Their business model makes it impossible to offer the granularity of custom sizing that a small, specialist workshop can provide. If you need a 4mm, 9mm, or 13mm spacer, you are simply out of luck. This is the benefit of supporting small UK businesses that specialise in solving these niche problems.
At 2d6 Designs, we can create spacers for almost any requirement. If you have a non-standard back box, an unusual gang configuration, or need a specific colour that is not listed, you can contact us directly. We thrive on finding solutions to the awkward DIY challenges that big-box stores ignore.
Material Matters: Flame Retardant ABS for Ultimate Peace of Mind
When dealing with any component near electrical wiring, safety is the absolute priority. That is why our custom spacers are not printed with standard plastics. We use a high-quality, flame retardant ABS (Acrylonitrile Butadiene Styrene) filament. ABS is a robust and durable thermoplastic known for its strength and heat resistance, but the flame retardant variant offers an essential extra layer of safety.
This material is designed to resist ignition and to self-extinguish if it does come into contact with a source of flame. This property is critical for components used in electrical installations, ensuring they do not contribute to the spread of a fire. By choosing a spacer made from flame retardant ABS, you are investing in a product that prioritises the safety and integrity of your home’s electrical system, giving you ultimate peace of mind.
How to Install a Light Switch Spacer Plate Safely
Installing a light switch extension plate is a straightforward job for a competent DIYer, but because it involves interacting with your home's wiring, you must follow safety procedures meticulously. Your safety is paramount, so never take shortcuts.
- Always isolate the power. Before you touch any electrical fitting, go to your consumer unit (fuse box) and switch off the circuit you are working on. Use a socket tester or multimeter to confirm there is no power to the switch.
- Measure the gap precisely. You need to know the exact depth required for your spacer. Measure from the front edge of the back box to the finished wall surface.
- Get the right screws. A new spacer will almost certainly require longer screws. Standard M3.5 screws are used for UK faceplates. If your spacer is 4mm or less, your original screws might just be long enough, but for anything thicker, you will need new ones.
- Take a photo of the wiring. Before disconnecting any wires, take a clear photo with your phone. This will be an invaluable reference to ensure you reconnect everything correctly.
Measuring for Your Extension Plate
Accurate measurement is the key to a perfect result. The most reliable way to measure is after your new wall surface is complete. Use a ruler or a depth gauge to measure the distance from the front-most part of the metal back box to the face of your new tiles or panelling. If you are tiling, remember to account for the thickness of the tile adhesive as well as the tile itself.
For a detailed walkthrough on getting this measurement spot on, you can read our complete guide on how to measure for a light switch spacer. This will help you decide on the exact thickness you need for a flawless, professional finish.
Step-by-Step Installation Guide
With the power confirmed to be off, you can begin the installation. Follow these steps carefully:
- Remove the Faceplate: Unscrew the two M3.5 screws holding the faceplate to the wall and gently pull it away. The wires will still be attached.
- Disconnect the Wires: Referring to the photo you took, carefully disconnect the wires from the terminals on the back of the switch. This is usually done by loosening a small screw for each wire.
- Position the Spacer: Place your new extension plate over the back box, ensuring the screw holes line up perfectly.
- Reconnect the Wires: Take the faceplate and, using your photo as a guide, reconnect each wire to its correct terminal, ensuring the screws are tightened securely. Give each wire a gentle tug to make sure it is held firmly.
- Secure the Assembly: Gently push the re-wired faceplate back towards the wall, feeding the wires carefully into the back box. Ensure no wires are pinched between the spacer and the faceplate. Align the faceplate with the spacer and insert your new, longer M3.5 screws. Tighten them until the faceplate is held firmly against the spacer with no wobble. Do not over-tighten.
- Restore Power: Go back to your consumer unit and switch the power back on. Test the switch to ensure it is working correctly.

Bespoke Home Solutions from 2d6 Designs
At 2d6 Designs, we are more than just a hardware supplier. We are a creative studio based in St Neots, UK, dedicated to solving those awkward DIY problems that standard shops ignore. Every product we create, from the most practical spacer to our beautiful home decor, is made with meticulous attention to detail.
- Every product is created with meticulous attention to detail in our UK studio.
- We specialise in solving those awkward DIY problems that standard shops ignore.
- Our range extends from practical hardware like our socket spacers to beautiful home decor.
- Our items are made with love and many cups of tea to ensure the highest quality.
Beyond Spacers: Creative 3D Printed Decor
Our passion for design and 3D printing extends far beyond practical fixes. We believe in combining modern technology with traditional British craftsmanship to create unique items that bring personality to your home. Once you have fixed your switches, you can add an artistic touch with one of our minimalist line art sculptures or personalise your gaming setup with a custom nameplate. It is all part of our philosophy of making homes more functional and more beautiful.
Why Choose 2d6 Designs for Your Renovation?
Choosing 2d6 Designs means you are supporting a small, independent UK business that cares about every single order. We offer national UK delivery with a personal touch that you will not find elsewhere. Because we control the entire design and manufacturing process, we have the unique ability to offer a truly bespoke service. If you have a one-off project or a unique problem, you can read about our custom 3D printing services to see how we can help. Do not just take our word for it; read our customer reviews to see how we have helped hundreds of other UK homeowners achieve a perfect finish.
Frequently Asked Questions
What is the difference between a light switch spacer and an extension plate?
The terms are often used interchangeably. Both describe a frame that sits behind a light switch faceplate to bring it forward. "Extension plate" or "extender" perhaps better describes its function of extending the switch from a recessed box, while "spacer" describes its role in filling a specific space. Ultimately, they refer to the same product.
Do I need an electrician to install a light switch extension plate?
If you are experienced and confident with basic home electrics and follow safety procedures strictly (especially isolating the power), you can install a spacer yourself. However, as the process now involves disconnecting and reconnecting wires, if you have any doubt or uncertainty, we strongly recommend hiring a qualified electrician. Safety should always be your first priority.
Can I stack multiple spacers if one is not thick enough?
We do not recommend stacking spacers. It can create instability, leading to a wobbly switch and an unprofessional finish. It is far better to measure the exact depth you need and order a single, solid spacer of the correct thickness. This ensures a secure, flush, and safe installation.
Are 3D printed spacers safe for use with UK electrical sockets?
Yes, provided they are made from the correct material. Our spacers are printed using a flame retardant ABS plastic, which is specifically chosen for its heat-resistant and self-extinguishing properties. This makes it a safe and reliable choice for use in electrical installations, offering superior safety compared to standard PLA or other hobbyist plastics.
What length of screws do I need for a 10mm extension plate?
You will need longer M3.5 screws. A standard faceplate screw is typically 25mm long. For a 10mm spacer, you would need a screw that is 10mm longer, so a 35mm or 40mm screw would be ideal. As a rule of thumb, add the thickness of your spacer to the original screw length.
Can I get a custom colour spacer to match my brass or chrome switches?
Absolutely. We offer a range of colours, including metallic finishes like silk gold, silver, and copper, which complement modern decorative faceplates like brass or chrome far better than a standard white plastic spacer. This allows for a cohesive and high-end look.
What happens if my back box is slightly wonky or misaligned?
A spacer can actually help to correct minor alignment issues. Because the spacer creates a solid, flat surface for the faceplate to mount onto, it can help straighten the final appearance of the switch, even if the box behind it is not perfectly level.
How do I measure the corner radius of my existing light switch?
An easy way to measure a corner radius is to use coins. A UK 5p coin has a radius of roughly 3mm, and a 10p coin has a radius of about 5mm. Place the coins on the corner of your faceplate to see which one aligns best with the curve. This will give you a good estimate for choosing a matching spacer.