
How to Measure for a Light Switch Spacer: A Complete UK Guide
Have you ever spent a whole weekend perfectly tiling your kitchen splashback, only to find your light switch now sits so deep in the wall it feels like a wobbly safety hazard? It's a common frustration for the seven million UK homeowners planning renovations this year, especially with the trend for thick wall panelling and decorative tiling. Learning how to measure for a light switch spacer is the simple secret to achieving a professional, flush finish. It prevents that dreaded, heart-sinking sound of a new tile cracking because you've over-tightened a screw against an empty gap.
We believe that every home deserves a bit of artisanal care; getting your electrical fittings to sit snugly shouldn't be a source of stress. This guide will teach you the precise method to measure your electrical gaps and choose the perfect spacer for a secure, safe result. We'll cover everything from the latest BS 7671:2018+A4:2026 safety standards to navigating confusing backbox depths, ensuring you have the confidence to order the right part first time. It's a straightforward fix made with love and many cups of tea, designed to bring your DIY project together with total precision.
You can design your perfect custom fit spacer now with the Build My Spacer tool on our new site: socketspacers.com.
Key Takeaways
- Master how to measure for a light switch spacer by calculating the exact distance from the backbox lugs to your new wall surface for a perfectly flush finish.
- Prioritise safety by isolating your electrical circuit at the consumer unit before loosening any faceplate screws or taking measurements.
- Understand why bespoke 1mm increments provide a more secure fit than standard trade spacers, which often fail to match the unique depths of DIY projects.
- Learn the correct technique for seating your spacer to prevent over-tightening screws and cracking expensive new tiles or decorative panelling.
- Ensure your home remains compliant with UK electrical standards while achieving a clean, professional look for every light switch in your house.
Table of Contents
- Understanding the Gap: Why Precision Matters for Light Switch Spacers
- Step-by-Step Guide: How to Measure for a Light Switch Spacer
- Selecting Your Spacer: Standard vs Custom 3D Printed Options
- Installing Your Spacer and Ensuring a Professional Finish
Understanding the Gap: Why Precision Matters for Light Switch Spacers
A light switch spacer is essentially a rigid frame, a bridge that spans the void created when you add a new layer to your walls. Whether you've just finished a sleek kitchen splashback or added some classic MDF panelling, the original backbox often ends up buried too deep. This is where understanding What is a Pattress Box? becomes handy, as the spacer must sit perfectly against this hidden metal or plastic housing to provide a solid foundation. Without this support, your faceplate is essentially floating, held only by two thin screws rather than a firm surface.
Precision is vital for both aesthetics and safety. If the measurement is off, the faceplate won't be supported across its entire surface area. This lack of support leads to several frustrating issues:
- Cracked grout: Repetitive flexing every time you flick the switch can shatter the seal around your tiles.
- Structural damage: Decorative panelling can splinter or dent under the pressure of an unsupported switch.
- Electrical safety: A firm fit ensures the faceplate sits tightly against the backbox lugs, maintaining the integrity of the earth connection as required by BS 7671:2018+A4:2026 standards.
Learning how to measure for a light switch spacer is therefore a matter of long-term durability as much as it is about achieving a clean finish.
The Tiling and Panelling Problem
UK renovation projects often involve adding tile adhesive or decorative panelling, which can add between 5mm and 15mm of depth to a wall. If you're unsure how to measure for a light switch spacer in these scenarios, remember that you need to account for every millimetre of that new surface. Decorative panelling often creates the deepest recesses, leading to 'floating switch' syndrome where the fitting feels wobbly and unsafe because there is nothing solid behind it to push against.
Why Longer Screws Are Not the Final Answer
You might be tempted to simply buy longer M3.5 screws and call it a day. While these will reach the backbox, they leave the faceplate unsupported in the cavity. This creates a risk of 'over-pulling' the switch into the wall, which can easily crack expensive tiles or distort the plastic plate. A physical light switch spacer provides a solid 'stop' for the faceplate to rest against, allowing you to tighten the screws without fear of damage. It ensures everything feels properly snug and professional, just as it should be.
Step-by-Step Guide: How to Measure for a Light Switch Spacer
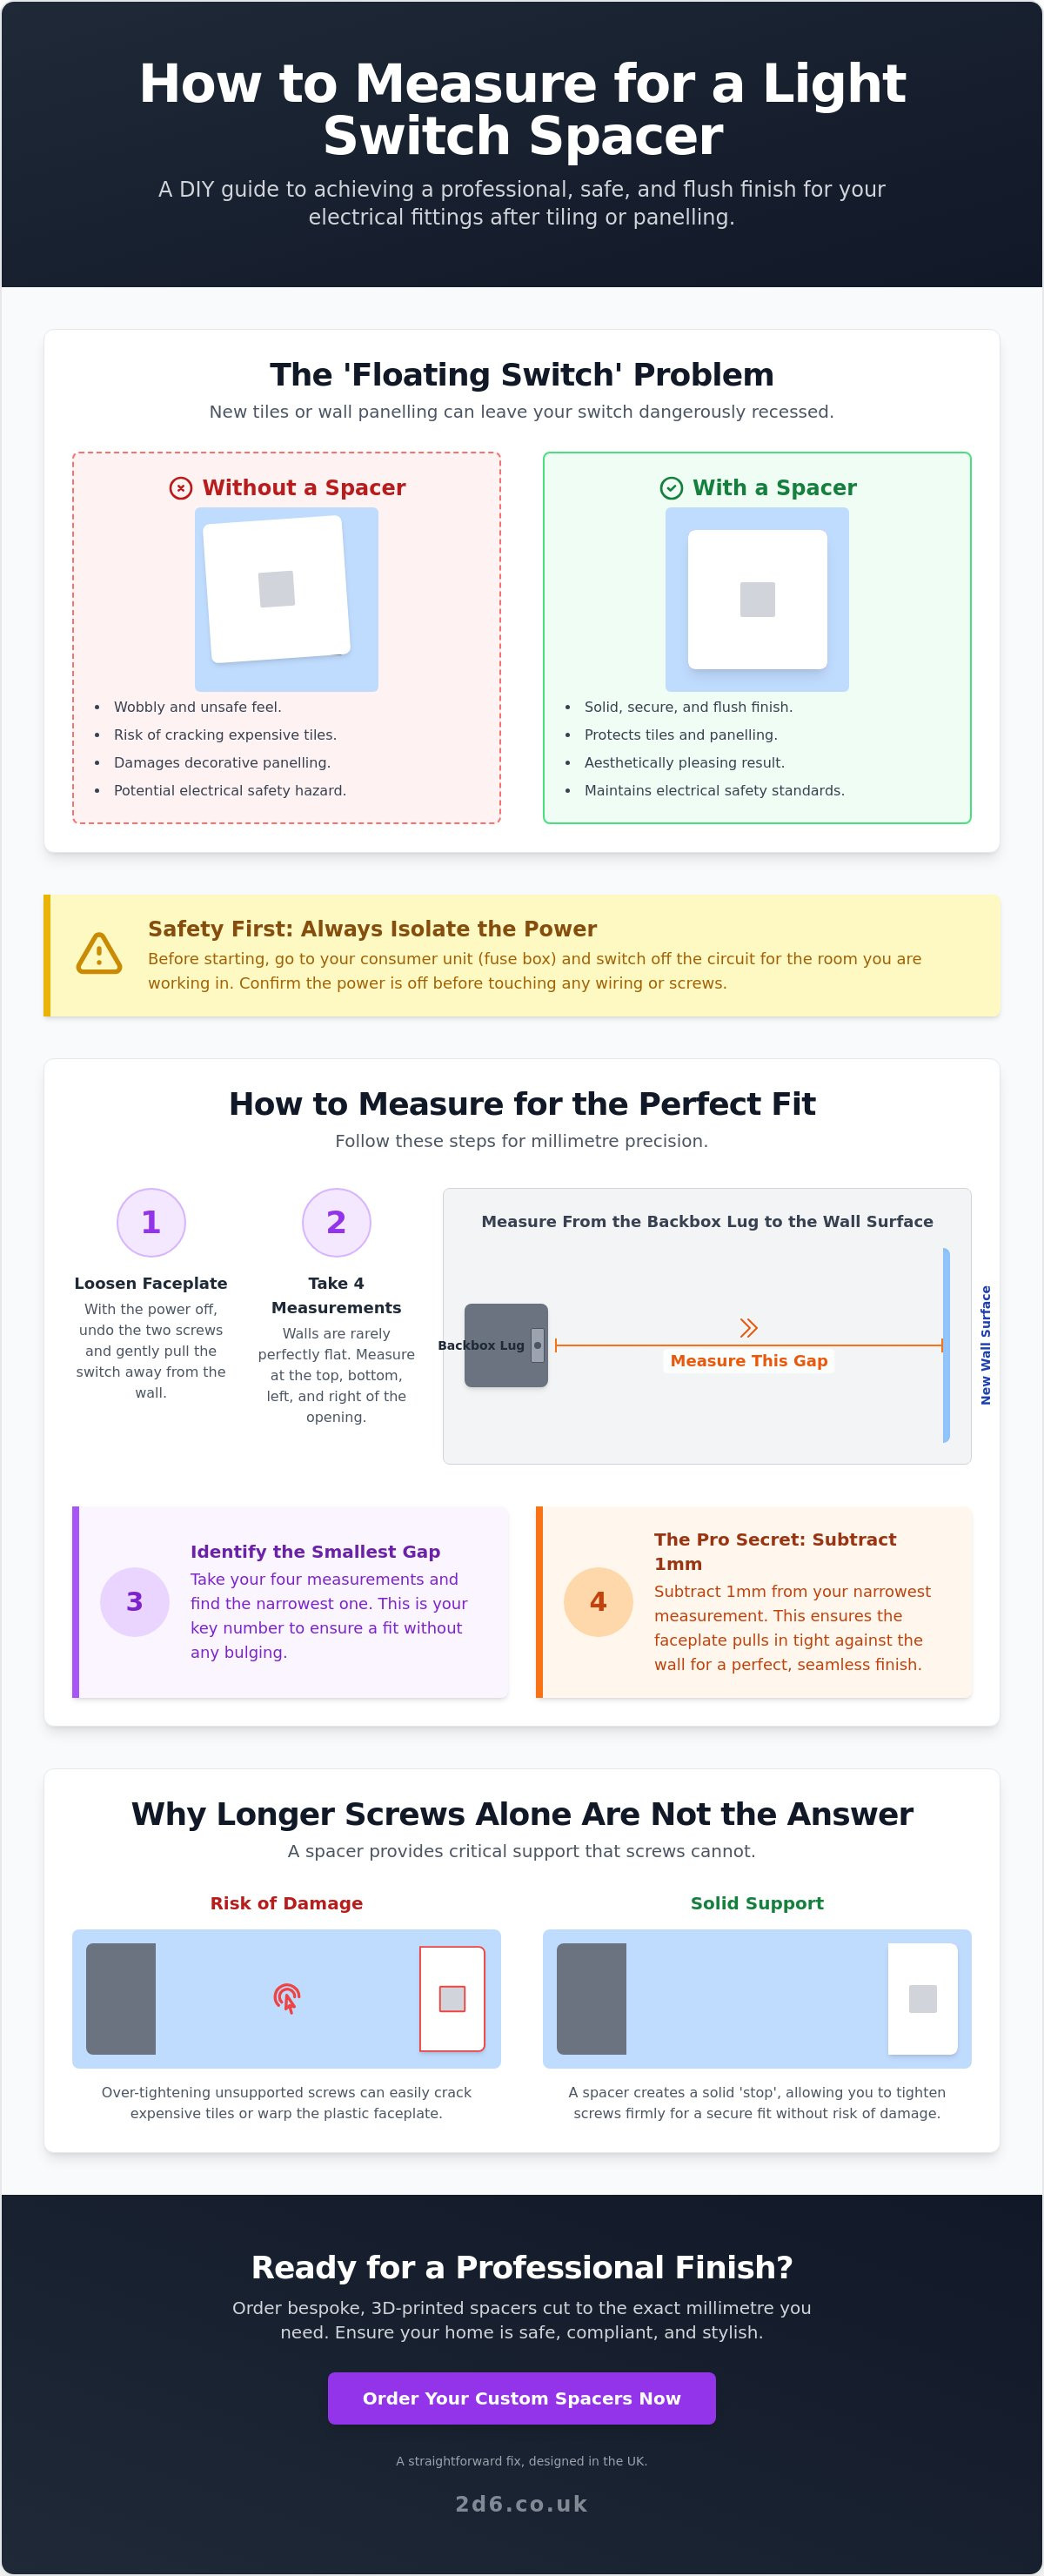
Before you even pick up a ruler, safety is the absolute priority. Head to your consumer unit and isolate the circuit for the room you're working in. Once you've confirmed the power is off, loosen the faceplate screws just enough to pull the switch away from the wall. You aren't looking for a rough guess here; you're looking for millimetre precision to ensure your home remains safe and stylish.
To find the exact depth required, measure from the front face of the backbox lugs to the finished surface of your new wall. Don't just take a single measurement and assume the wall is flat. Walls, especially in older UK homes, are notorious for being uneven. Take four separate measurements: one at the top, bottom, left, and right of the opening. This accounts for variations in tile adhesive or slightly wonky plasterboard.
Once you have your four numbers, identify the narrowest measurement. Subtract 1mm from this figure. This small adjustment is the secret to a professional finish; it ensures the faceplate pulls in tight against the wall surface rather than sitting proud or leaving a tiny, unsightly gap. Ensuring the gap is properly supported is not just about looks; it's a vital part of electrical installation fire performance, as it prevents potential sparks from reaching flammable wall cavities or insulation.
Tools You Will Need for an Accurate Measurement
A standard tape measure is often too bulky for these tight electrical gaps and can lead to parallax errors. For the best results, use a digital calliper or a depth gauge. If you don't have those to hand, the 'straight edge' method works brilliantly. Place a small spirit level or a flat metal ruler across the gap, resting it on the finished wall. Then, use a second ruler to measure from the backbox lug up to the underside of your straight edge. It's a simple, honest way to get the precision you need.
Managing Uneven Walls and Tiles
If you're dealing with heavily textured tiles or lipped edges, always measure to the deepest point of the recess. If the spacer is too thin, the switch will still wobble; if it's too thick, it will look like an afterthought. If your measurements result in a non-standard size like 13mm or 17mm, don't settle for a stack of washers or a 'near enough' trade part. You can easily order a bespoke light switch spacer that's printed to your exact millimetre requirements, ensuring a perfect fit every time.
Finally, double-check your 'gang' size. In the UK, a standard single switch is 1-gang, whilst a wider double switch is 2-gang. Measuring the outer dimensions of your faceplate ensures the spacer frame stays hidden behind the plastic or metal edge, maintaining that clean, artisanal look you've worked so hard to achieve.
Selecting Your Spacer: Standard vs Custom 3D Printed Options
Once you've mastered how to measure for a light switch spacer, you'll likely find that your gap doesn't perfectly match the stock items found in a local hardware store. Most standard trade spacers are sold in fixed 10mm or 15mm increments. While these are fine for rough trade work, they rarely provide the flush, professional finish a homeowner wants after a careful renovation. If your measurement is 13mm, using a 10mm trade part leaves a 3mm wobble; a 15mm part will leave the switch sitting proud of the wall.
Custom 3D printed spacers from 2d6 Designs change this dynamic by offering precision in 1mm increments. This bespoke approach ensures that your faceplate is supported across its entire surface area, leaving no room for the switch to flex or the tiles to crack. It is also a safer choice. By ensuring a tight fit that adheres to UK electrical safety standards, you eliminate the risk of dust or debris entering the wall cavity behind a loose fitting. We take great pride in this meticulous level of detail, bridging the gap between modern manufacturing and traditional craftsmanship.
Single Gang vs Multi-Gang Considerations
Most UK switches use standard 60.3mm screw centres for a single (1-gang) box or 120.6mm centres for a double (2-gang) box. However, modern interiors often feature more complex arrangements. For these setups, you might require custom multi-gang faceplate spacers to ensure every switch in the row is perfectly aligned. A single, solid frame is always superior to stacking multiple smaller spacers, as it provides a uniform foundation that won't shift over time.
Material and Aesthetic Choice
Material matters just as much as the measurement. High-quality PLA is an ideal choice for domestic electrical spacing because it is rigid, durable, and can be printed in specific colours. Unlike the translucent or bright red 'trade' versions that often peek out from behind the faceplate, 2d6 Designs allows you to choose black, white, or grey to match your switch. This creates a seamless, almost invisible look. A solid frame also avoids the 'lollipop' effect of using individual plastic washers, which offer very little support to the edges of the faceplate.
A solid spacer ensures that even premium switches with decorative bevelled edges sit perfectly without the spacer overlapping the design. It's about getting that high-end look without the high-end stress. If you're ready to finish your project with total precision, you can order your custom light switch spacer here and get that satisfying, flush fit today.
Installing Your Spacer and Ensuring a Professional Finish
Once you've followed the steps on how to measure for a light switch spacer, the physical installation is the most satisfying part of the project. Gently slide your new spacer over the loose faceplate, ensuring the internal frame aligns perfectly with the screw holes. It should act as a sturdy bridge between the hidden backbox and your new wall surface. This solid foundation is exactly what prevents the 'floating switch' feeling common in many UK renovations.
When tightening the screws, always do so by hand rather than using a power driver. Manual tightening allows you to feel the tension, ensuring the spacer is seated squarely against the wall without over-stressing the plastic. Tighten until the faceplate feels firm and immovable. If you notice a tiny hairline gap between the spacer and a heavily textured tile, a minute bead of colour-matched caulk can be used to create a truly seamless look. Finally, toggle the switch several times to verify it operates freely and doesn't catch on the internal edges of the spacer frame.
Troubleshooting Common Installation Issues
Sometimes, even with a perfect measurement, you might find your existing screws are now too long for the backbox depth. If the screw bottoms out before the faceplate is tight, you will need to source shorter M3.5 electrical screws. During the final fit, pay close attention to the wiring: ensure no cables are pinched between the spacer and the backbox lugs. If your wall is significantly out of plumb, you can slightly shift the spacer's position before the final tighten to ensure the switch looks level to the eye, even if the wall is not.
The Finishing Touch
Give the faceplate and your new light switch spacer a quick wipe with a soft cloth to remove any fingerprints. This provides that 'just-installed' shine that marks the end of a successful DIY task. A correctly fitted spacer also makes future decorating much easier, as the switch remains a solid, fixed point whilst you paint or wallpaper around it. At 2d6 Designs, we take immense pride in this meticulous level of detail, ensuring that every piece we create brings a sense of artisanal quality and precision to your home.
Achieve Your Perfect Professional Finish
You now have the knowledge to fix wobbly switches and protect your beautiful new tiles. By mastering how to measure for a light switch spacer, you've moved beyond standard trade fixes to a truly bespoke solution. Whether you're dealing with deep kitchen tiles or intricate wall panelling, the right spacer bridges that gap with total confidence. Remember to always isolate the power first and take measurements from multiple points to account for uneven walls. This small extra effort ensures your home remains safe, compliant, and aesthetically flawless.
Our British-made spacers are crafted with meticulous care through precision 3D printing. We offer custom sizes ranging from 2mm up to 20mm; this ensures a perfect fit that standard shop-bought parts simply can't match. With over 19 five-star reviews for our electrical solutions, you can trust that your project is in good hands. It's time to put down the spirit level and enjoy the results of your hard work. You've got this!
Browse our range of custom-sized Light Switch Spacers
Frequently Asked Questions
Can I stack multiple thin spacers if I don't have the right size?
You can stack spacers in an emergency, but it isn't the best way to achieve a professional finish. Stacking multiple parts creates several layers that can shift or compress over time, leading to a switch that eventually feels loose again. A single, solid 3D printed spacer provides a much more stable foundation. It ensures the faceplate is supported by one continuous piece of material, which is far more reliable for long-term use.
Do I need a different spacer for a double (2-gang) light switch?
You will certainly need a different frame for a double light switch. A single UK switch uses a 1-gang spacer, whereas a double switch requires a wider 2-gang version. Measuring the total width of your faceplate is a vital step in how to measure for a light switch spacer. This ensures the spacer remains neatly tucked behind the plate without any edges showing on your new wall surface.
What is the maximum thickness a light switch spacer can be?
Most faceplate spacers are effective for gaps up to 20mm. If your recess is deeper than this, you might struggle to find M3.5 electrical screws long enough to reach the backbox safely. For very deep gaps, you should consider whether the internal wiring is under strain. In most domestic UK renovations involving tiling or panelling, a custom spacer between 3mm and 15mm is usually sufficient to bring the switch flush.
Will a light switch spacer work with a dimmable switch?
Light switch spacers are perfectly compatible with dimmable switches. The spacer sits behind the outer edges of the faceplate and doesn't interfere with the dimming electronics housed inside the backbox. As long as your backbox has the depth required for the dimmer module, the spacer simply provides the external support needed to keep the plate firm. It's an ideal fix for modern smart switches that often sit slightly proud of the wall.
Is it safe to use 3D printed plastic spacers for electrical fittings?
It is safe to use 3D printed spacers made from high-quality PLA for domestic electrical spacing. These materials are non-conductive and provide a rigid, durable frame that won't degrade behind your light switch. Our spacers are designed to provide mechanical support rather than acting as a primary electrical enclosure. They are a reliable, artisanal solution for bridging the gap between your backbox and your finished wall surface without any safety risks.
How do I know if I need a backbox extender instead of a faceplate spacer?
You need a backbox extender if you must fully enclose the internal wiring to meet specific fire safety requirements or if you need more room for cables. However, a faceplate spacer is the better choice for most DIY projects like tiling or panelling. If your backbox is secure but just sits too deep, learning how to measure for a light switch spacer will allow you to provide the necessary surface support for a wobble-free finish.