
The Ultimate Guide to Switch Spacers: Fixing Recessed Sockets with Ease
You’ve just finished tiling the kitchen splashback or plastering the living room wall, and it looks fantastic. But when you go to refit your light switches and plug sockets, you hit a snag. The electrical backbox is now sunk deep into the wall, leaving an ugly, unprofessional gap around the faceplate. This is a common renovation headache, but thankfully, there’s a simple, safe, and stylish solution: the switch spacer.
Discover how to professionalise your home renovations by using switch spacers to fix recessed electrical boxes safely and stylishly.
You can design your perfect custom fit spacer now with the Build My Spacer tool on our new site: socketspacers.com.
Table of Contents
- What is a Switch Spacer and Why Does Your Home Need Them?
- Types of Electrical Spacers: Choosing the Right Depth and Gang
- The Benefits of 3D-Printed Spacers vs Mass-Produced Hardware
- How to Install a Switch Spacer Safely: A DIY Guide
- Beyond the Fix: Completing Your Home Aesthetic
What is a Switch Spacer and Why Does Your Home Need Them?
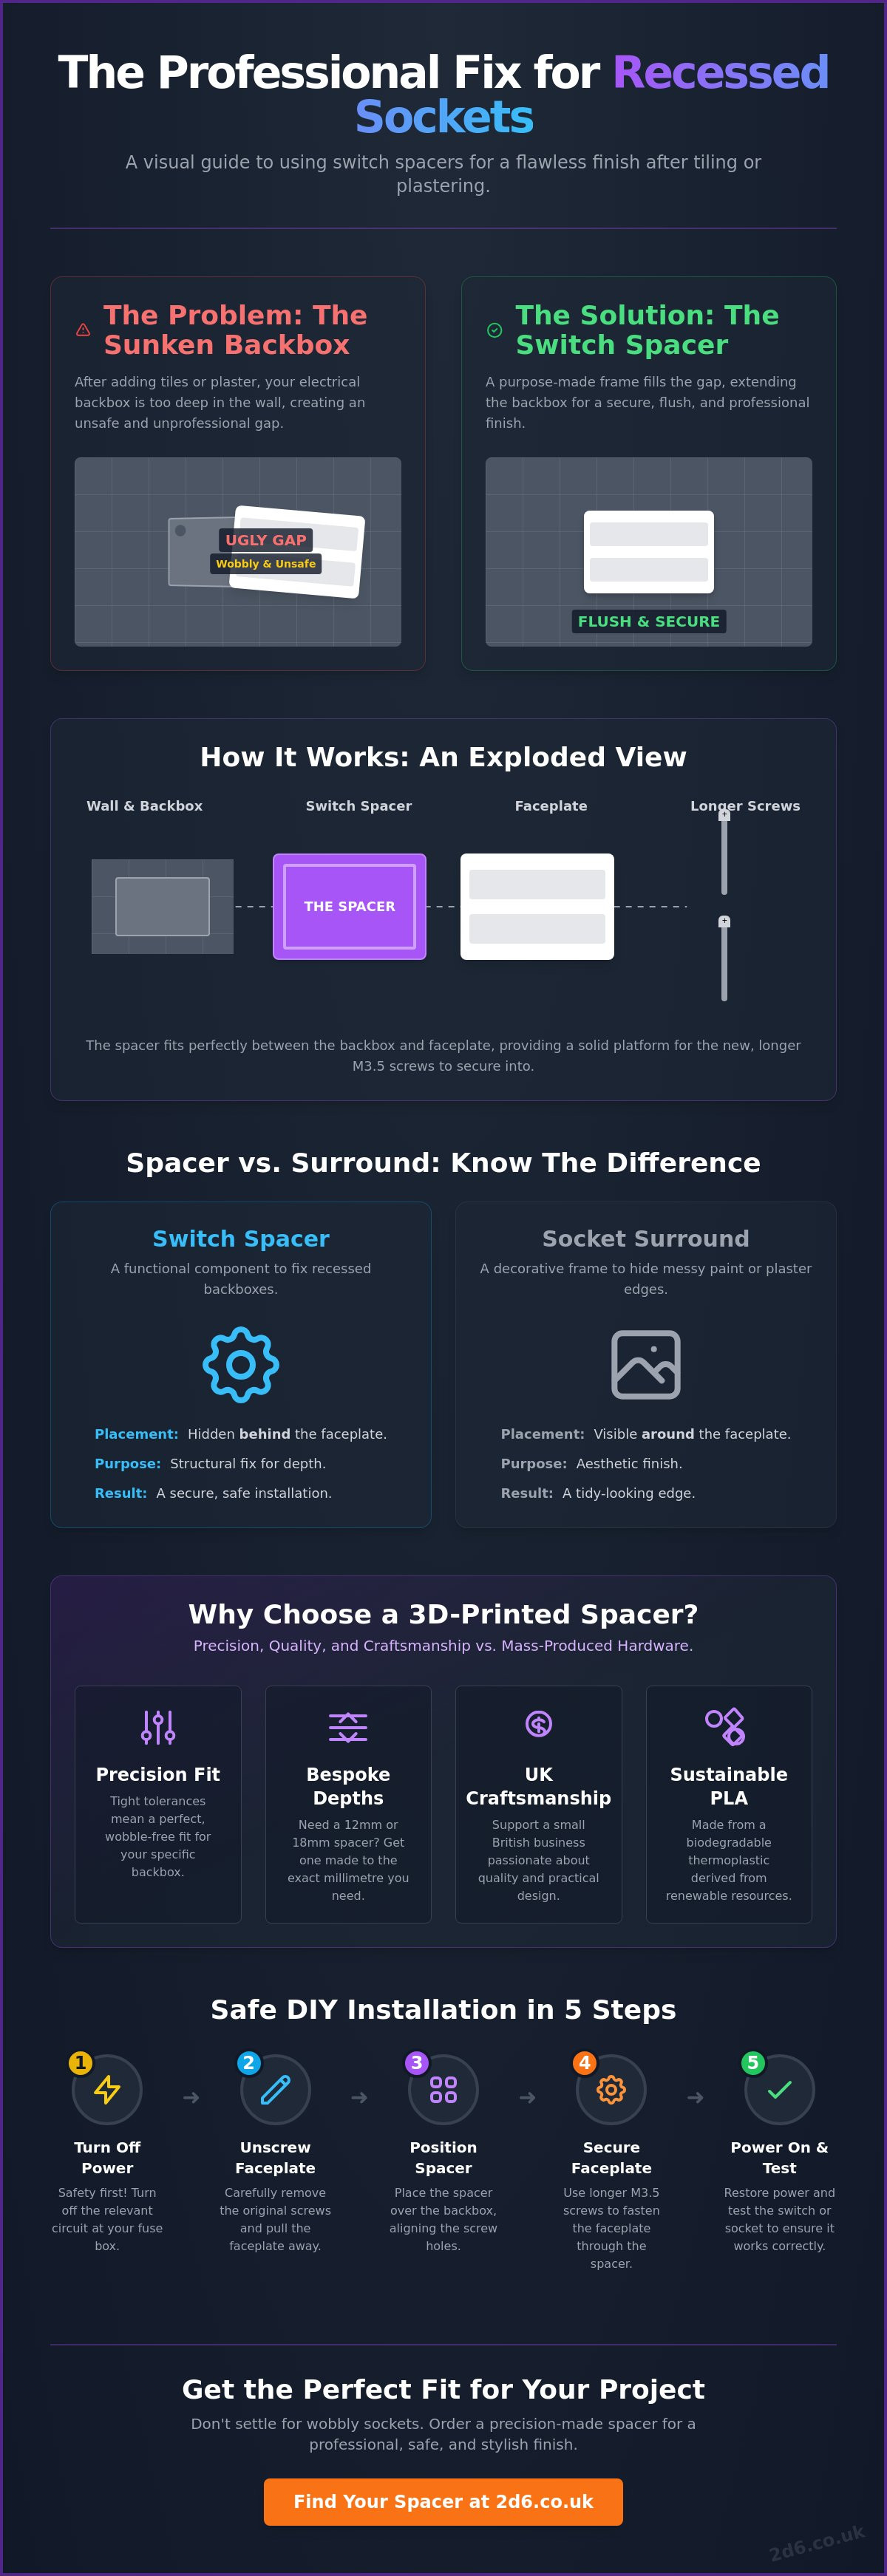
A switch spacer is a purpose-made frame that fits perfectly between the electrical backbox in your wall and the back of your socket or light switch faceplate. Its job is to fill the gap created by new layers of plaster, tiles, or wall panels, allowing the faceplate to sit perfectly flush with the new wall surface. It effectively extends the front of the backbox forward, solving the problem of recessed fittings.
- The Problem: After renovations like tiling a kitchen or plastering a wall, the surface becomes thicker. This leaves the metal or plastic backbox, which houses the wiring, sitting too far back.
- The "Wobbly Socket" Syndrome: When you try to tighten the original screws, the faceplate bends into the recess, causing it to crack or wobble. The standard screws are often too short to get a secure grip, leaving the fitting dangerously loose.
- The Solution: A switch spacer provides a solid, stable platform for the faceplate to be mounted against. This ensures a secure fit, prevents damage, and gives a clean, professional finish.
The Difference Between Spacers and Surrounds
It's easy to confuse spacers with surrounds, but they serve very different purposes. A spacer is a functional component that solves a depth problem; it sits hidden behind the faceplate. A surround, on the other hand, is a decorative frame that fits around the outside of the faceplate to hide messy paint lines or chipped plaster. While a surround is for aesthetics, a socket spacer is a structural necessity for a safe and secure installation.
According to Pattress box, this is a well-documented area of ongoing research and practical application.
Common Signs You Need a Spacer
- There is a visible gap between the wall and the edge of your switch or socket faceplate.
- The faceplate feels loose, wobbly, or sinks into the wall when you plug something in or flick the switch.
- Your existing M3.5 screws are too short to securely fasten the faceplate to the backbox lugs after tiling or plastering.
Types of Electrical Spacers: Choosing the Right Depth and Gang
Finding the right spacer is simple once you know what to look for. The two key factors are the "gang" (the size of your switch plate) and the depth of the gap you need to fill.
- Gang Configuration: In the UK, "gang" refers to the number of switches or sockets on a single faceplate. A 1-gang spacer is for a single switch or socket, while a 2-gang spacer is for a double socket or dual light switch.
- Standard Depths: Spacers come in various depths to match the thickness of your new wall surface. Common sizes like 10mm, 15mm, and 20mm cover most tiling and plastering jobs.
- Material Matters: For safety and durability, spacers should be made from a robust, flame-retardant material. High-quality plastics like PLA, used in 3D printing, offer excellent strength and stability.
- Colour Matching: Most spacers come in neutral colours like white, black, or grey to blend seamlessly with standard electrical fittings.
Single vs Double Socket Spacers
A "gang" is simply the UK electrical standard term for how many switches or sockets are on one plate. A 1-gang spacer is what you'll need for standard light switches and single plug sockets. For the common double sockets found in kitchens and living rooms, you'll need a 2-gang spacer to ensure a perfect, level alignment.
Research published by National Electrical Code shows that this is a well-documented area of ongoing research and practical application.
Fixed vs Stackable Spacers
While some hardware stores sell stackable ring-style spacers, a solid, one-piece spacer offers far greater structural stability. A fixed-depth spacer provides an even, flat surface that prevents the faceplate from bending or sitting at an angle. For non-standard gaps, a custom-fit light switch and socket spacer can be made to the exact millimetre, guaranteeing a perfect fit that stackable solutions can't match.
The Benefits of 3D-Printed Spacers vs Mass-Produced Hardware
When you choose a 3D-printed spacer from a specialist maker, you're getting more than just a piece of plastic. You're opting for precision, quality, and craftsmanship that big-box retailers can't replicate.
- Precision Fit: 3D printing allows for incredibly tight tolerances, resulting in a spacer that fits your backbox and faceplate perfectly, with no unwanted movement.
- Sustainable Materials: Many 3D-printed products are made from PLA, a biodegradable thermoplastic derived from renewable resources like corn starch, making it a more eco-friendly choice.
- Supporting British Craftsmanship: Buying from a UK-based maker means you're supporting a small, passionate business that takes pride in every item produced.
- Bespoke Solutions: Need a 12mm spacer for a specific tile? Or a spacer for a non-standard smart switch? 3D printing makes it possible to create custom sizes that aren't available on the high street.
Quality and Craftsmanship
There's a tangible difference in quality when a product is made with care and attention. At 2d6 Designs, we blend geeky precision with a passion for practical problem-solving. Each spacer is crafted not just to do a job, but to do it perfectly, ensuring your home improvements have that professional, polished feel.
Comparison: 2d6 Designs vs High Street Retailers
Mass-produced spacers from major retailers are designed for standard installations and may not fit designer or non-standard switches. Artisanal 3D printing is the future of home hardware because it puts the power of bespoke manufacturing into the hands of homeowners, delivering custom-fit solutions with the speed and personal touch of a local business.
How to Install a Switch Spacer Safely: A DIY Guide
Fitting a switch spacer is a straightforward DIY task that you can complete in minutes. However, your safety is paramount. Always follow these steps carefully.
- Safety First! Isolate the Power: Before you touch any wiring, go to your consumer unit (fuse box) and switch off the circuit you'll be working on. Use a socket tester to confirm there is no power to the socket. This step is non-negotiable.
- Measure the Gap: Use a ruler to measure the distance from the front of the backbox to the surface of the new wall. This will tell you the depth of spacer you need (e.g., 10mm or 15mm).
- Get Longer Screws: Your original screws will be too short. You will need new M3.5 screws. To find the right length, add your spacer's depth to the length of your original screw (or add the spacer depth to about 25mm). For a 10mm spacer, a 35mm or 40mm screw is usually ideal.
- Install the Spacer: Follow the step-by-step guide below.
- Final Checks: Once installed, ensure the faceplate is level and sits firmly against the wall with no gaps. Then, you can safely restore the power.
Step-by-Step Installation
- With the power confirmed off, unscrew the faceplate and gently pull it forward, taking care not to strain the wires connected to the back.
- The 2d6 Designs spacer is a frame. Simply slide it over the faceplate from behind, so it rests between the back of the faceplate and the wall.
- Align the screw holes on the faceplate with the holes on the spacer.
- Push the faceplate and spacer back towards the wall, aligning them with the backbox.
- Insert your new, longer M3.5 screws through the faceplate and spacer, and tighten them into the threaded lugs on the backbox until the faceplate is secure and flush. Do not over-tighten.
When to Call a Professional
While fitting a spacer is simple, you should always call a qualified electrician if you notice any signs of damaged or frayed wiring, scorch marks, or loose connections inside the backbox. Electrical work in UK homes is governed by Part P of the Building Regulations, so if you are in any doubt, it is always best to seek professional help.
Beyond the Fix: Completing Your Home Aesthetic
It's amazing how a small detail like a flush-fitting socket can elevate the feel of a room from "in-progress" to "perfectly polished." Adopting a "do it once, do it right" attitude to these finishing touches is what separates a good renovation from a great one. This attention to detail is the hallmark of modern British home design.
Getting Started with 2d6 Designs
Ready to banish those wobbly sockets for good? Browse our full collection of socket and light switch solutions, all made in the UK with care, attention, and many cups of tea. If you have a unique challenge or need a custom size, don't hesitate to contact our team. We love solving problems and can create a bespoke 3D-printed solution just for you.