
Mastering 3D Print Design: A Practical Guide to Creating Custom Parts in the UK
You have spent hours meticulously sketching a bracket, only to find that the finished piece doesn't actually fit the plug socket it was meant for. It’s a common frustration for makers across the country, especially when you're trying to produce high-quality custom 3d printed parts uk residents can actually use in their homes. Designing for the physical world requires a shift in mindset from digital perfection to real-world tolerances. It’s time to stop wasting filament.
We understand that sinking feeling when a print fails or a part snaps because the walls were just a bit too thin. It's easy to get lost in a sea of CAD software options or struggle with the quirks of FDM printing. This guide will help you master the fundamental principles of 3D print design so you can transform your sketches into professional-grade objects that work perfectly the first time. We'll explore how to choose the right tools, manage tolerances for a snug fit, and recognise when it’s time to call in a professional 3D printing service to handle the heavy lifting. Everything we do is made with love and many cups of tea, and we want to help you bring that same artisanal care to your own projects.
Key Takeaways
- Understand why designing for FDM printing requires a different approach to traditional manufacturing to ensure your models are actually printable.
- Master the 45-degree rule and learn how to calculate precise tolerances so your parts fit together perfectly without the need for messy supports.
- Navigate the choice between parametric CAD for functional household fixes and organic sculpting software for more artistic, decorative pieces.
- Discover the essential iteration cycle of printing, testing, and refining to produce professional-grade custom 3d printed parts uk makers can use for bespoke home solutions.
- Learn how to select the right materials for your project and identify when a professional 3D printing service is the best choice for a flawless finish.
Foundations of 3D Print Design for UK Homes
3D print design is the meticulous process of crafting a digital blueprint specifically for additive manufacturing. Unlike traditional injection moulding, which requires expensive, permanent moulds and massive production runs, 3D printing allows for a single, unique piece to be created without industrial overhead. Understanding the history of 3D printing helps us see how this technology has moved from high-end labs into the heart of the British home. Today, we primarily use Fused Deposition Modelling (FDM), which builds your part layer by layer from the build plate upwards. This additive thinking is a complete shift from carving material away; it is about growing an object to fit a specific need.
To better understand this concept, watch this helpful video:
When you are looking for custom 3d printed parts uk suppliers, you'll find that standard high-street retailers often fall short. They cater to the average house, but many British homes have unique quirks, such as non-standard electrical boxes or slightly irregular wall surfaces. Whether you need a bespoke bracket for an alcove shelf or a specific light switch spacer, custom design allows you to solve these domestic puzzles with absolute precision. It is a process that values quality and attention to detail, ensuring every piece feels like a natural extension of your living space.
The Role of STL and 3MF Files
Your design begins as a raw CAD model, but it must be exported as a mesh file for the printer to interpret the geometry. Most makers use STL or 3MF formats. File resolution is vital here; if the resolution is too low, your curved household items will look blocky or low-poly. Slicer software then takes this mesh and translates it into the thin physical layers that the printer follows. Choosing the right resolution ensures your finished part looks professional and smooth once it is in your hands.
Designing for British Domestic Standards
British homes have specific standards, from the dimensions of our plug sockets to the way our furniture is constructed. Using 3D printing to replace a snapped plastic clip on an appliance or creating socket spacers for a newly tiled kitchen ensures a perfect fit that off-the-shelf parts cannot provide. Custom design means you can match the colour and style of your existing decor. This makes every repair or improvement look intentional and seamless, providing a level of integration that mass-produced alternatives simply cannot offer.
Core Principles for Successful 3D Printable Parts
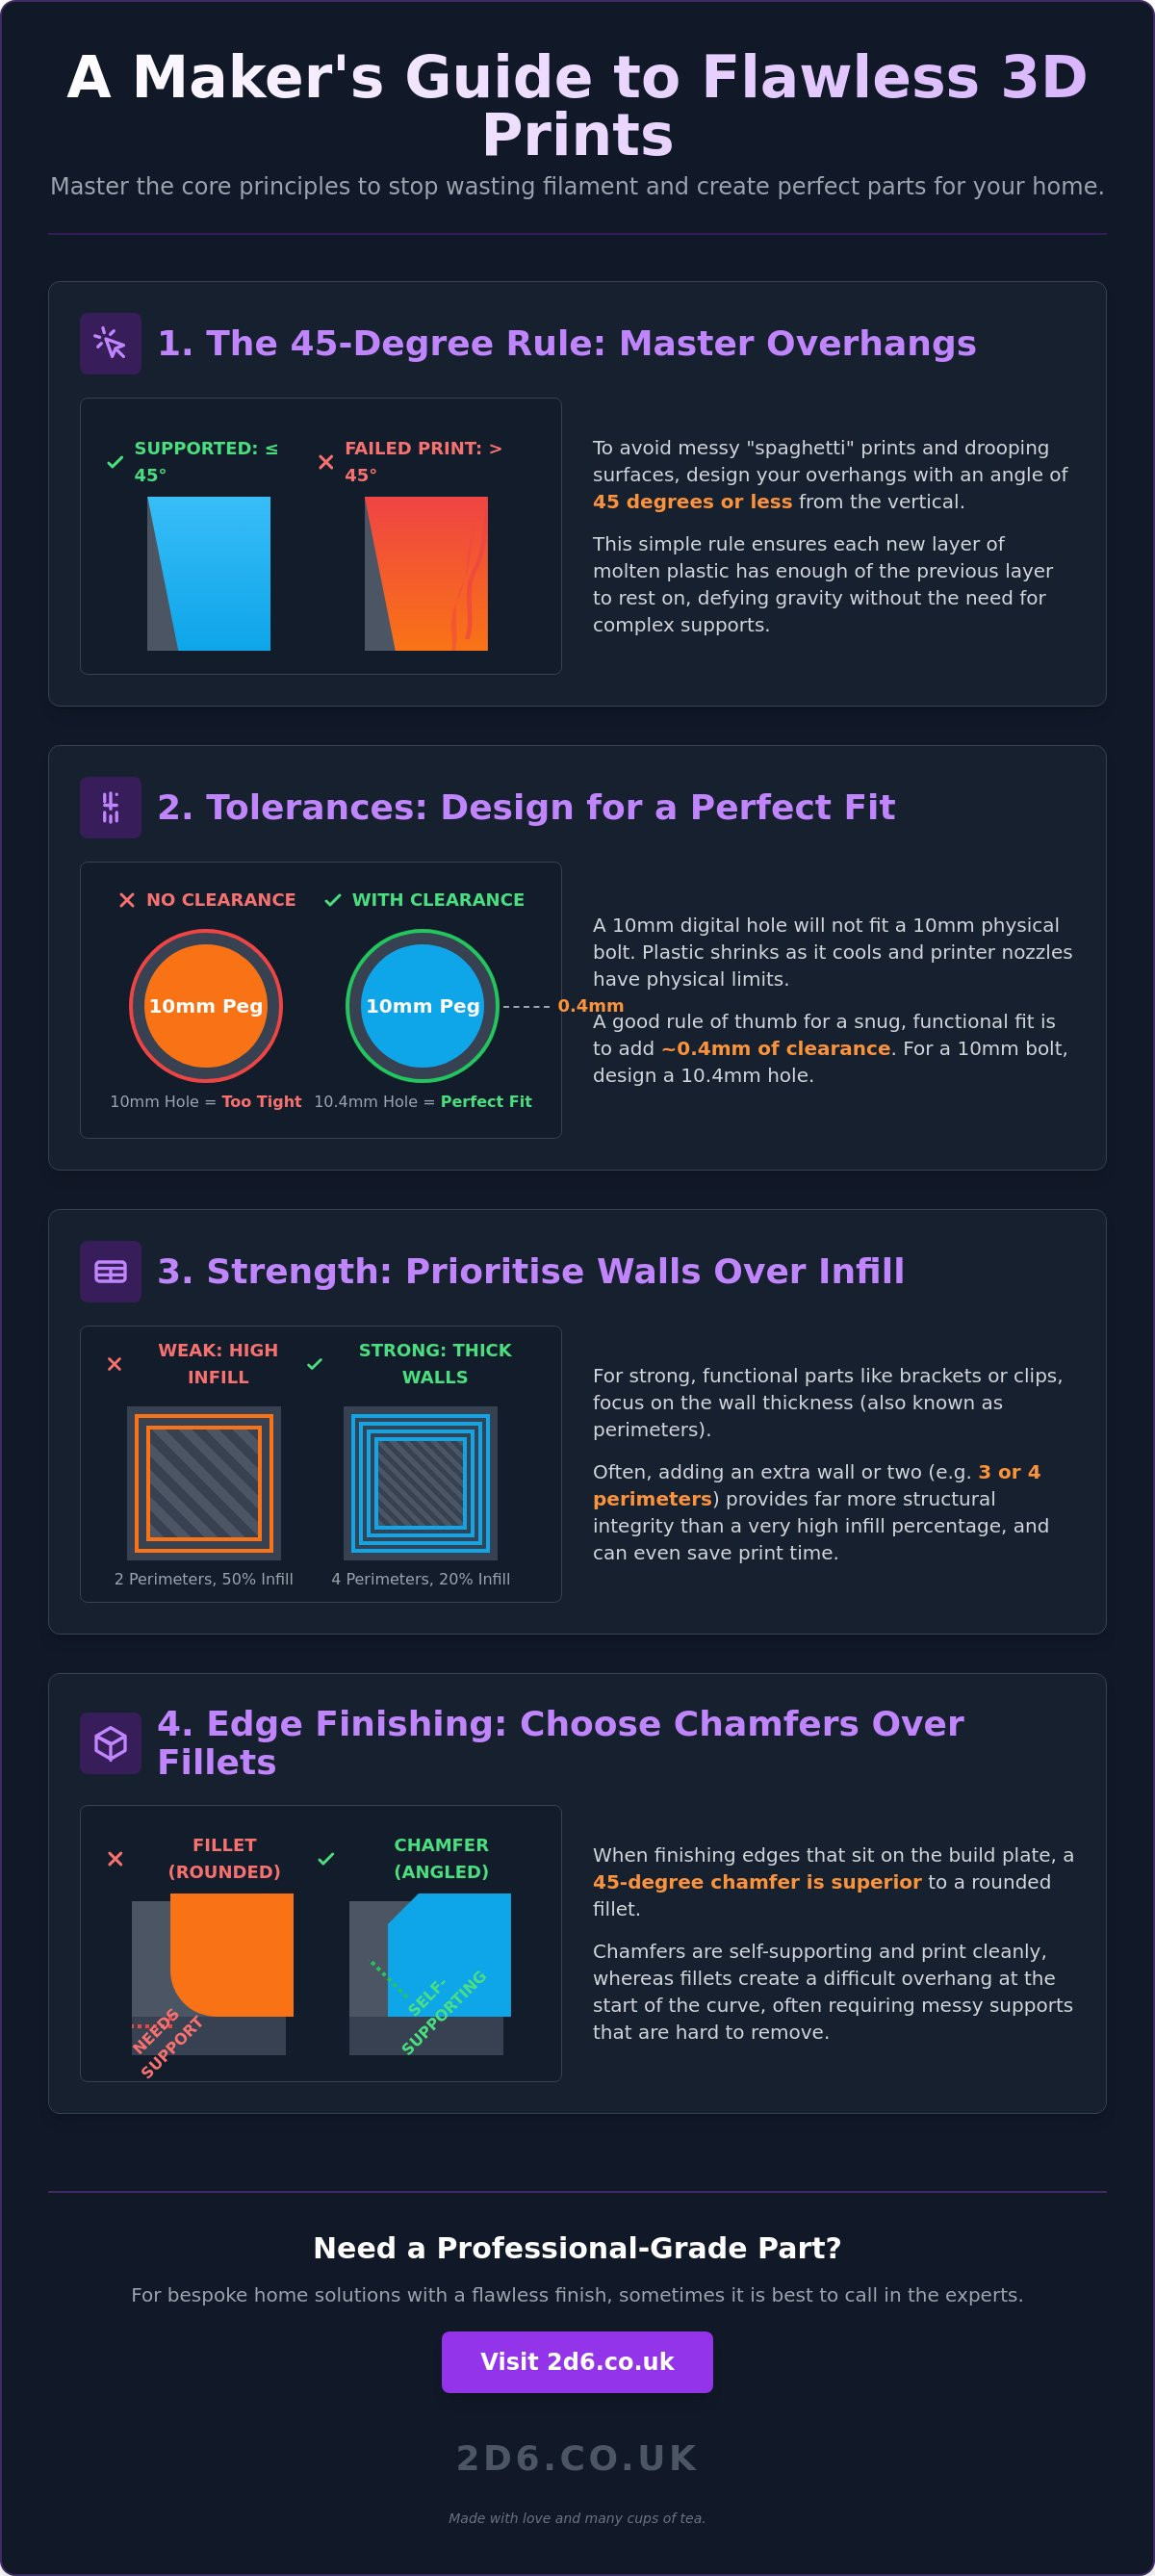
Designing for the physical world is where the magic happens, but it is also where the frustration begins if you don't follow a few golden rules. When creating custom 3d printed parts uk makers often learn that a digital model on a screen doesn't always reflect the reality of molten plastic. The most famous guideline is the 45-degree rule. Because FDM printing builds in mid-air, every layer needs a bit of the previous one to sit on. If you design an angle steeper than 45 degrees, you are essentially asking the printer to defy gravity, which usually leads to drooping surfaces or "spaghetti" prints.
Next, you must consider tolerances and clearances. If you design a 10mm hole for a 10mm bolt, it simply won't fit. Plastic expands slightly as it cools, and the physical limits of the printer's nozzle mean that holes often shrink. A good rule of thumb for functional parts is to allow a clearance of around 0.4mm. This means that a 10mm bolt requires a 10.4mm hole to slide in comfortably without the need for aggressive sanding or filing.
Wall thickness and infill are your primary tools for balancing strength with material usage. For a simple household bracket, three or four perimeters (walls) usually provide more structural integrity than a very high infill percentage. You can experiment with different patterns in your 3D printing software to find the sweet spot between a sturdy part and a quick print. When finishing your edges, chamfers are often superior to fillets for the base of a print. A 45-degree chamfer is self-supporting, whilst a fillet starts at a shallow angle that often requires messy supports to look clean.
Managing Overhangs and Bridging
Gravity is a constant factor in the printing process. When a part stretches across a gap, it is known as bridging. Short bridges are fine, but longer ones will sag as the plastic stays molten for a few seconds. To avoid messy support structures that leave marks on your finish, try to design self-supporting angles into your geometry. If you find these rules a bit daunting for your first project, you might find it easier to start with our ready-made socket spacers to see how professional tolerances work in practice.
Strength and Layer Adhesion
Think of a 3D print like a stack of bricks; it is very easy to snap them apart where they join. This is why orientation is vital for functional parts. Prints are always weakest along the vertical Z-axis. If you're designing a hook, don't print it standing up, or the weight will simply pull the layers apart. Print it flat on the bed so the continuous lines of plastic take the load. Anisotropy in 3D printing is the variation in structural strength based on the direction of the print layers.
Choosing the Right 3D Design Software
Selecting your software is the first real step in bringing custom 3d printed parts uk projects to life. You generally have two paths: parametric CAD or organic sculpting. Parametric software allows you to build a history-based model. This means if you realise your light switch spacer needs to be 2mm thicker, you can simply go back in your timeline and change one number. All subsequent steps will update automatically. This precision is vital when adhering to 3D printing design standards, especially for functional household items where every millimetre counts.
Most functional designs start with a simple 2D sketch. You draw a shape, define its dimensions in metric units, and then "extrude" it into the third dimension. This workflow is incredibly powerful for creating bespoke brackets or replacement parts that must interface with existing UK hardware. For projects requiring standard high-quality components alongside your custom prints, Door-Tech Services provides a reliable source for door and window hardware. Whilst some professional tools have a steep learning curve, the ability to organise your design through a logical history makes complex projects much more manageable. It's about finding the tool that matches your creative passion without feeling like a chore.
Top Software Options for Beginners
Tinkercad is a fantastic entry point. It uses simple geometric shapes that you can group together, making it perfect for basic home fixes. For those ready to dive deeper into functional hardware, Fusion 360 is the industry standard. It offers the parametric power needed for precise engineering. If your goal is more aesthetic, Blender is the ultimate choice for creating intricate line art sculptures or organic forms that feel more like digital clay than a technical drawing.
From Screen to Slicer
A common pitfall is creating non-manifold geometry. This happens when your digital model has holes or overlapping faces that don't exist in the physical world. Slicers get confused by these impossible shapes. Always check your model for flipped normals and ensure you export in the correct units. If you design in millimetres but export in inches, your part will arrive at the printer 25 times too large. If you'd rather leave the technical bits to us, you can always order a custom nameplate to see how we handle these meticulous details for you.
Bringing Your Custom 3D Designs to Life
The journey from a digital file to a tangible object is where your hard work finally pays off. This final stage is rarely a one-off event; it is a cycle of printing, testing, and refining your model until it sits perfectly in its intended spot. You might find that a bracket needs a slightly deeper countersink or a nameplate requires a bolder font to stand out. This iterative process is the secret to producing the high-quality custom 3d printed parts uk residents need for successful home improvements. By embracing the test-and-refine method, you ensure the final result is a reliable, professional-grade solution.
Selecting the right material is vital for the longevity of your project. Polylactic Acid (PLA) is the most popular choice for indoor items and decorative pieces due to its ease of use and wide colour range. Our socket spacers are typically produced in PLA because it offers excellent dimensional stability for household electrical fixes. If your part needs to survive a warm kitchen environment or requires a bit of flex to snap into place, Polyethylene Terephthalate Glycol (PETG) provides the extra durability and heat resistance needed for more demanding applications.
The Advantage of Professional Bespoke Services
Whilst desktop printers are more accessible than ever, there is a distinct advantage to using a professional bespoke service. At 2d6 Designs, we use meticulously calibrated machines and high-grade materials to ensure a finish that budget home setups often struggle to match. We can advise on the best print orientation to avoid the layer adhesion issues discussed earlier, ensuring your critical home fixes are as strong as they are beautiful. Our approach combines modern manufacturing with the artisanal care of a passionate maker, providing a level of quality you can feel in the finished part.
This commitment to precision is shared by high-end studios worldwide. For example, 3Distica specialises in transforming creative concepts into high-quality tangible assets, demonstrating the incredible results possible when professional design meets advanced fabrication technology.
If you have a complex design or simply want a flawless finish for your project, you can contact 2d6 Designs to discuss your requirements. There is a profound sense of pride in completing a bespoke project that fits your home perfectly, and we are here to help you cross that finish line with a part that is truly fit for purpose. Whether it is a small repair or a major home upgrade, the right design paired with professional production makes all the difference.
Transform Your Home Ideas into Reality
Mastering the 45-degree rule and understanding the importance of 0.4mm tolerances are the first steps toward design success. By choosing the right software for your needs, you can move past simple downloads and start creating truly bespoke solutions for your living space. Whether you are repairing a beloved piece of furniture or designing complex custom 3d printed parts uk homes require for a seamless finish, the power to innovate is now in your hands. It is about bridging the gap between digital precision and the warmth of a well-kept home.
We take immense pride in our regional sense of craftsmanship. As specialists in functional home improvement solutions like socket spacers, we ensure every piece is expertly crafted in the UK with meticulous attention to detail. You don't have to tackle the steep learning curve alone. You can get a personalised service from a passionate maker who understands the specific needs of British domestic standards. Explore our bespoke 3D printing services for your custom designs and let's build something wonderful together. Your next great project is just a sketch away, so don't be afraid to dream big and print even bigger.
Frequently Asked Questions
What is the best software for 3D print design for beginners?
Tinkercad is a lovely place to start if you're new to the craft. It uses simple blocks and holes to build shapes, which is perfect for basic home fixes. If you want more control for functional projects, Fusion 360 offers professional tools with a manageable learning curve. Both allow you to export files ready for a custom 3d printed parts uk service to handle.
How do I ensure my 3D printed parts fit together correctly?
You must include clearances in your design to account for plastic expansion. A gap of 0.4mm is usually the sweet spot for parts that need to slide together. Without this tiny bit of breathing room, your pieces will likely be too tight. It is always better to design with a small tolerance than to spend hours with a file trying to fix a snug fit.
Do I need to be good at maths to design 3D prints?
You don't need to be a mathematician to design beautiful prints. Modern software handles the heavy lifting and complex geometry for you. As long as you can use a ruler or a pair of callipers to take basic measurements of your household items, you'll be fine. It is more about having a clear idea and a bit of patience than solving equations.
What is the difference between an STL and a CAD file?
A CAD file is your living design where you can easily change dimensions or shapes. An STL is a snapshot of that design converted into a mesh of triangles for the printer. Think of it like the difference between a recipe you can tweak and the final cake. You'll always want to keep your original CAD file in case you need to make adjustments later.
Can I 3D print a design I found online for my own home?
Yes, there are wonderful communities online where makers share their designs for free. You can download these files and use a custom 3d printed parts uk service to bring them to life. Just check the licence to ensure it is for personal use. It is a brilliant way to find clever solutions for the home that others have already perfected and tested.
What happens if my 3D design is not manifold?
A non-manifold design essentially has impossible geometry, such as holes in the mesh or edges that don't quite meet. Slicer software needs a solid, watertight object to calculate the print layers correctly. If your file isn't manifold, the printer won't know what is inside or outside. Most modern design tools have a repair function to help you tidy up these digital loose ends.