
How to Add Wiring Space Behind a Faceplate: A Guide to Socket Spacers
Have you ever spent an afternoon wrestling with a socket that just won't sit flush against the wall? It's a frustrating battle against stiff copper wires that seem determined to spring back and ruin your neat decor. Trying to force the screws often leads to the fear of pinching a cable or causing a short circuit, yet the alternative of digging out the plasterwork feels like far too much mess. If you need to add wiring space behind a faceplate, there is a way to do it that doesn't involve a sledgehammer or a call to a professional plasterer.
We believe in simple, clever fixes that respect the manual effort you've put into your home. You'll discover how to safely create that much-needed extra room using socket spacers, ensuring your outlets look professional and stay safe. We will explore how these small but mighty extension plates can save your sanity and your walls, providing a tidy solution that's as reliable as it is easy to install. It's the kind of project that's best tackled with a bit of patience and many cups of tea.
You can design your perfect custom fit spacer now with the Build My Spacer tool on our new site: socketspacers.com.
Key Takeaways
- Understand the safety risks of crushed cables and how to prevent insulation failure without the need for messy wall chasing.
- Discover the most efficient way to add wiring space behind faceplate installations using socket spacers for a neat, flush finish.
- Learn how to accurately measure for 1-gang or 2-gang extension plates to ensure your electrical outlets sit perfectly against the wall.
- Master the safe installation process, starting with isolating the circuit at the consumer unit for complete peace of mind during your project.
Table of Contents
- Why You Need to Add Wiring Space Behind a Faceplate
- Methods to Increase Space: Deepening vs. Spacing
- Choosing the Right Spacer for Your Electrical Project
- Step-by-Step: How to Install a Socket Spacer Safely
- Why Bespoke 3D Printed Solutions Beat Generic Hardware
Why You Need to Add Wiring Space Behind a Faceplate
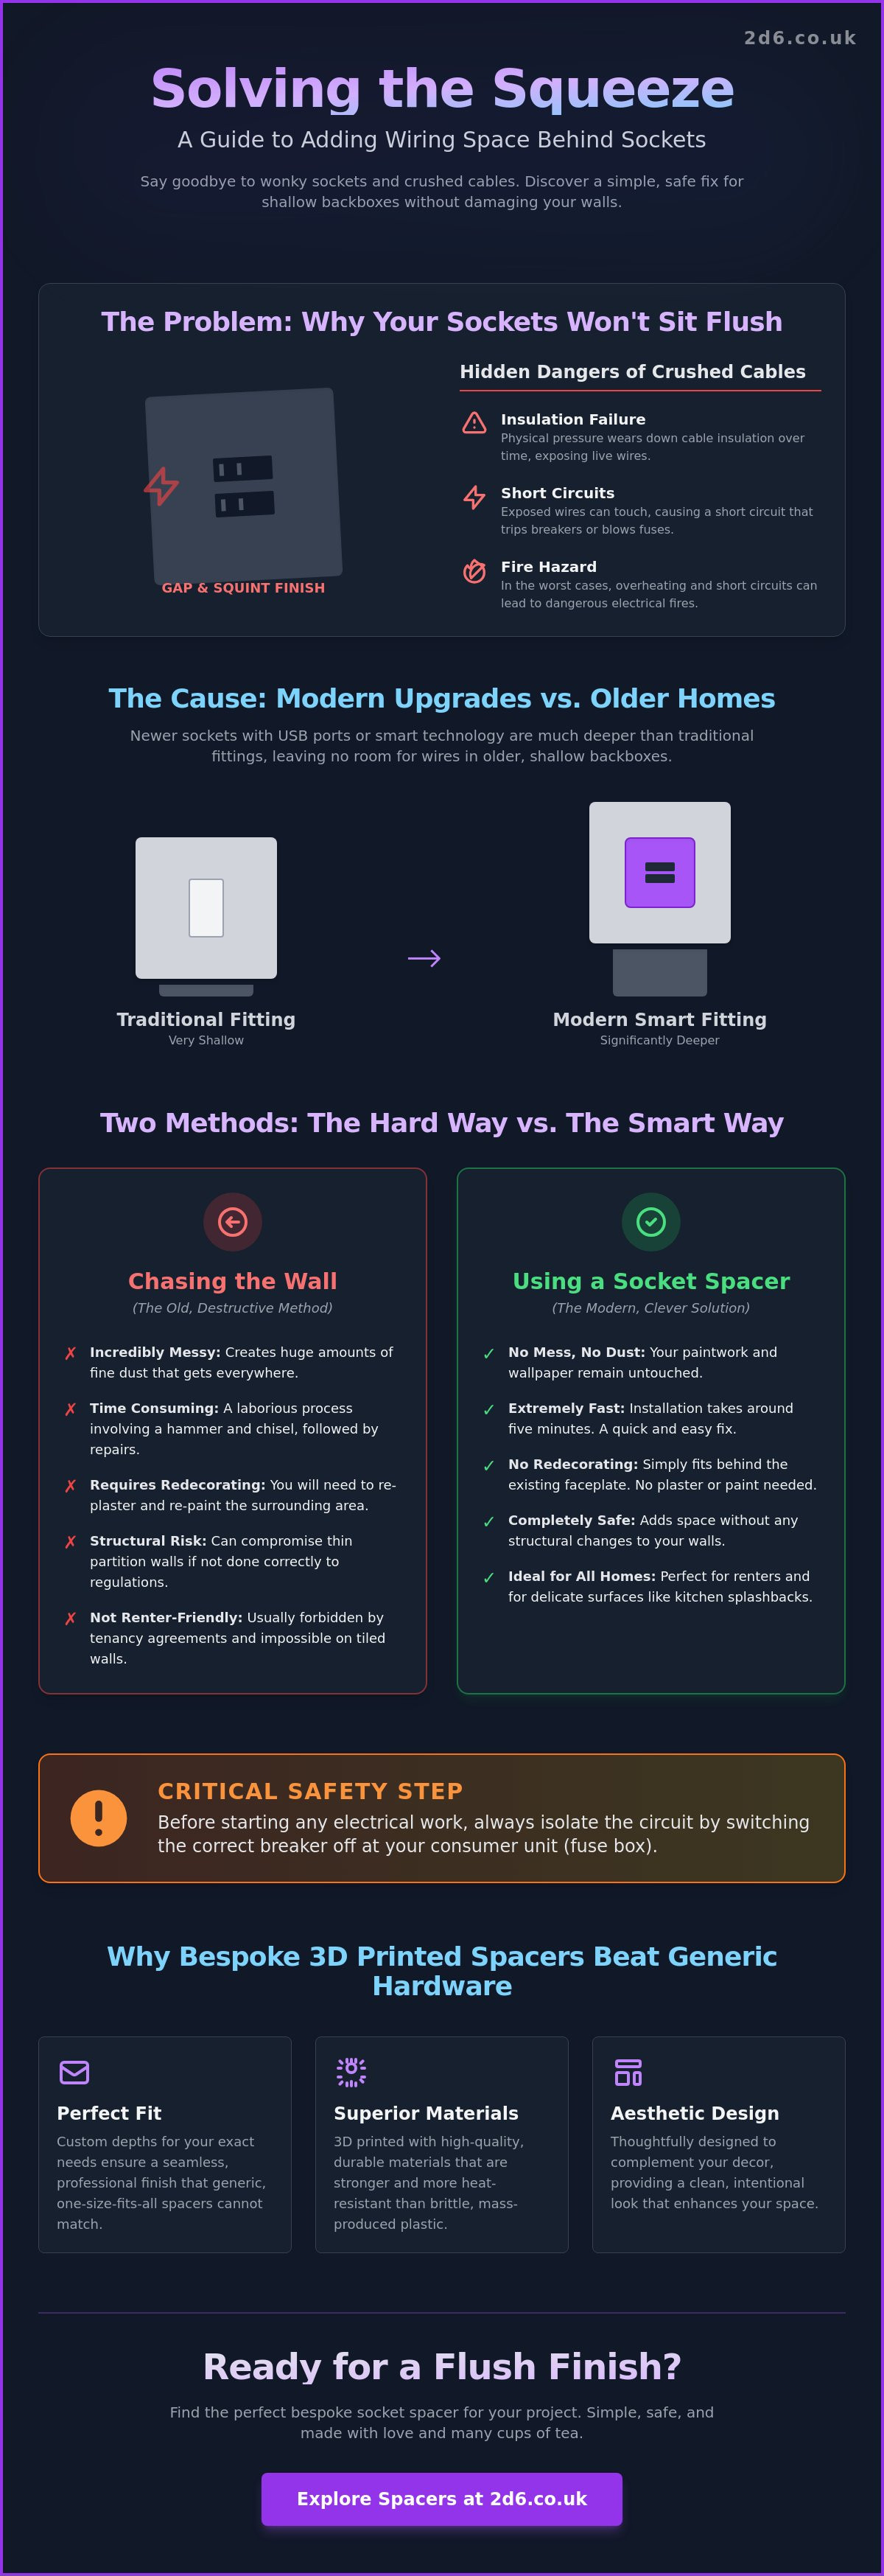
When you decide to add wiring space behind faceplate fittings, you are doing more than just fixing a wonky socket. Adding space essentially means creating a safe, managed cavity within your wall or mounting point to house the electrical connections and cables. In many UK homes, the electrical junction box or backbox is simply too small for modern needs. If you try to force a faceplate into a space that is too tight, you risk "crushing" the cables. This physical pressure can cause insulation failure over time, which leads to short circuits and, in the worst cases, electrical fires.
Safety is not just about avoiding physical damage; it is also about temperature. Electrical cables generate heat when they carry current, especially under high loads from appliances like kettles or heaters. Without a small air gap for heat dissipation, these cables can overheat. Providing that extra room ensures your home stays safe and your electrical components last much longer.
Modern electrical upgrades often make this problem worse. If you are installing USB-integrated sockets, smart dimmers, or Wi-Fi-enabled switches, you will notice these units are significantly deeper than traditional ones. Whilst a standard light switch is quite shallow, a smart dimmer might take up almost the entire depth of the box, leaving no room for the actual wires. This is the primary reason why homeowners need to add wiring space behind faceplate installations to maintain a flush, safe finish.
The Problem with Shallow Backboxes
Most older UK properties were built with 16mm or 25mm backboxes. These were perfectly fine for simple switches, but they fail modern requirements. Even a 35mm box can struggle to house the thick ring-main cables found in kitchens. When wires are forced into tight bends, the copper strands undergo physical stress. This fatigue can lead to brittle wires that eventually snap or arc, creating a hidden hazard behind your decorative plates.
Signs Your Wiring is Too Crowded
You can usually tell if your wiring is struggling for room by the way the faceplate behaves. If the screws feel "spongy" or offer heavy resistance as you tighten them, the wires are likely pushing back against the plate. You might see a visible bulge in the plastic or a persistent gap between the socket and the wall. In some cases, the pressure makes it impossible to align the socket horizontally, leaving you with a squint finish that no amount of spirit-level checking can fix.
Methods to Increase Space: Deepening vs. Spacing
Choosing how to add wiring space behind faceplate fittings usually comes down to a choice between brute force and clever design. The traditional route, often called chasing, involves physically deepening the hole in your wall with a hammer and chisel. It is a laborious process that generates incredible amounts of fine dust, often requiring you to cover every piece of furniture in the room. In contrast, using a dedicated spacer takes about five minutes and leaves your wallpaper or paintwork exactly as it was. For anyone living in a rented property, this is often the only viable option, as structural changes to the walls are usually forbidden by tenancy agreements.
Chasing the Wall: When is it Necessary?
Chasing the wall is sometimes unavoidable if a backbox is so shallow that even a spacer won't provide the clearance needed for complex smart home hubs. However, the hidden costs are significant. Once you have hammered out the masonry, you still face the task of re-plastering and painting the surrounding area. In the UK, building regulations are quite specific about this. Horizontal chases should be no deeper than one-sixth of the wall thickness, whilst vertical ones can go up to one-third. It is a lot of maths and mess for a simple socket upgrade. If you aren't careful, you can even compromise the structural integrity of a thin partition wall.
The Rise of the Socket Spacer
The rise of the socket spacer has changed the game for DIY enthusiasts. These plates act as a neat extension to the existing backbox rim, sitting behind the faceplate to bridge the gap and effectively add wiring space behind faceplate installations without any structural damage. They are particularly brilliant for kitchen splashbacks or tiled walls where digging into the surface would likely crack expensive ceramics. By ensuring the enclosure is secure and the wires are not pinched, you are following the principles of safe operation and maintenance for your home's electrical network.
We have seen these evolve from basic industrial plastic into sleek, artisanal designs that actually complement your decor. They provide a sturdy, flush finish that looks intentional rather than like a last-minute fix. If you are looking for a way to finish your project without the headache of masonry work, you might want to browse our range of socket spacers to find the perfect fit for your home.
Choosing the Right Spacer for Your Electrical Project
Selecting the correct hardware for your UK home often feels like a bit of a puzzle. Every wall is slightly different, and modern faceplates vary in depth more than you might expect. When you decide to add wiring space behind faceplate fittings, the first step is identifying the size of your existing setup. In most British homes, you'll be dealing with either a 1-gang (single) or 2-gang (double) configuration. Getting this right is essential, as the spacer needs to align perfectly with the British Standard screw holes in your backbox to ensure a sturdy, wobble-free finish.
The material of your spacer matters just as much as the size. We use high-quality PLA for our products because it offers the durability needed for long-term use whilst allowing for a level of precision that industrial injection moulding often misses. By selecting a material that maintains its shape and provides a solid foundation for your socket, you ensure your installation meets fundamental OSHA electrical safety requirements for secure mounting and mechanical strength. This attention to detail prevents the spacer from warping over time, keeping your wires safe and your faceplate flush.
Single vs Double Socket Spacers
Whether you are fixing a single light switch or a large double power outlet, you need a spacer that matches the footprint of your accessory. Our range of socket spacers covers standard UK dimensions, ensuring the edges blend seamlessly with the wall. If you are dealing with multi-gang plates or bespoke smart home controllers, a standard spacer might not cut it. In these cases, look for custom options that respect the specific dimensions of your hardware to avoid any unsightly overlaps or gaps.
Measuring for Success
To determine the depth you need, try this simple trick: unscrew your faceplate and pull it forward until the wires are no longer under tension. Measure the gap between the faceplate and the wall with a ruler. Standard depths like 10mm or 15mm usually solve the problem, but it's always better to have a slightly deeper cavity than one that is too shallow. Don't forget to account for the "lip" or the decorative edge of your faceplate, as this can affect how the spacer sits against the wall surface. Taking these precise measurements ensures you can add wiring space behind faceplate installations with total confidence.
Finally, consider the aesthetic side of things. A bright white spacer might look great against a standard plastic socket, but it will stand out like a sore thumb against a brushed chrome or black nickel finish. Colour matching is a small step that makes a huge difference, turning a functional fix into a professional-looking feature of your room. We take great pride in offering various finishes, ensuring that your practical safety solution doesn't compromise the style of your home.
Step-by-Step: How to Install a Socket Spacer Safely
Before you begin the process to add wiring space behind faceplate fittings, you must ensure your working environment is completely safe. Electrical work should never be rushed. Start by heading to your consumer unit and isolating the circuit you intend to work on. It isn't enough to simply flip the wall switch off; you need to kill the power at the source. Use a reliable voltage tester to check the socket or switch for dead before you even touch a screwdriver. This small step provides total peace of mind whilst you handle the internal components of your home's electrical system.
Once you are certain the power is off, use an insulated screwdriver to remove the two screws holding the faceplate in place. Gently pull the plate away from the wall. You might find that the wires are quite stiff, so proceed slowly to avoid pulling any connections loose from their terminals. This is the moment where you finally add wiring space behind faceplate accessories by sliding your chosen spacer over the cables. Ensure all the wires are fed through the centre of the spacer cleanly, without any tangles or sharp bends that could cause stress on the copper strands over time.
Ready to get started? You can find the right size for your project in our collection of socket spacers, designed to fit standard UK backboxes perfectly.
Tools and Materials Required
Having the right kit on hand makes the job much smoother. You will need an insulated screwdriver, a voltage tester, and, most importantly, a pair of longer M3.5 electrical screws. The original screws that came with your socket will almost certainly be too short once the spacer is in place. Reusing them is a common mistake that leads to stripped threads or a loose, unsafe fitting. Organise your workspace by placing a small tray nearby to hold your screws, preventing them from rolling away or getting lost amongst the carpet pile.
The Final Connection
To achieve a professional finish, you need to "dress" the wires properly. Instead of just shoving them back into the box, try folding them in a gentle concertina pattern. This allows the cables to compress naturally as you push the faceplate back towards the wall. Align the spacer so it sits flush against the wall surface, then thread your longer M3.5 screws through the faceplate and spacer into the backbox lugs. Tighten them gradually, checking with a spirit level to ensure the plate remains level and plumb. Once everything is secure, restore the power at the consumer unit and test the socket for correct operation. If you've followed these steps, you should have a neat, safe, and perfectly flush outlet.
Why Bespoke 3D Printed Solutions Beat Generic Hardware
When you look for ways to add wiring space behind faceplate fittings, you will often find generic, mass-produced options at local hardware stores. These industrial pieces are designed to be "one size fits all," which usually means they don't quite fit anything perfectly. Bespoke 3D printed solutions offer a refreshing alternative, bridging the gap between technical necessity and artisanal care. By choosing a custom-made spacer, you ensure the dimensions match your specific decorative plates, preventing unsightly overlaps or gaps that ruin a room's aesthetic. Each of our pieces is hand-crafted with care and meticulous attention to detail, reflecting a level of personal investment you simply won't find in a factory-moulded product.
The environmental impact of your home improvements matters too. We use PLA (Polylactic Acid) for our spacers, which is a plant-based material often derived from corn starch or sugar cane. This makes it a more eco-friendly choice compared to traditional petroleum-based plastics used in industrial injection moulding. Choosing 3D printing isn't just about getting a better fit; it's about supporting a more sustainable, small-batch manufacturing process right here in the UK. This approach allows for meticulous quality control, ensuring that every edge is smooth and every screw hole is perfectly aligned before it reaches your door.
Customisation for the Modern Home
Modern interior design often features unique, slimline, or designer faceplates that standard hardware simply cannot accommodate. If you need to add wiring space behind faceplate installations with non-standard dimensions, a bespoke service is your best friend. You can request specific depths that aren't available in "off the shelf" ranges, ensuring your smart home tech or USB sockets have exactly the room they need without a millimetre of wasted space. You can learn more about our 3D printing process and how we prioritise precision for every household solution.
Beyond the Socket: A Cohesive Home
The same care we put into our functional socket spacers extends to our more creative endeavours. We believe that even the most practical household fixes should share the same DNA as your decor. This philosophy is why our workshop also produces intricate line art sculptures, allowing you to bring a consistent sense of craftsmanship to every corner of your home. Supporting a small UK business means you get direct access to technical advice and customer support from people who actually made the product. It is a more personal way to improve your home, ensuring that every small detail, from your wiring to your wall art, is handled with conscientiousness and pride.
Finish Your Electrical Project with Confidence
You now have the knowledge to transform a frustrating DIY struggle into a tidy, professional finish. By choosing to add wiring space behind faceplate installations with a dedicated spacer, you avoid the unnecessary mess of chasing walls and the safety risks of crushed cables. It is a simple fix that respects both your time and your home's decor. You don't need to be a professional plasterer to achieve a result that looks intentional and sits perfectly flush against your wall.
Our workshop specialises in hand-finished 3D prints made in the UK, ensuring every piece meets our high standards of craftsmanship. We understand that standard sizes don't always work for every property, which is why we offer custom depths upon request to suit any unique project. This commitment to quality and attention to detail has earned us 5-star reviews from DIYers and professionals alike. Browse our full range of British-made socket and switch spacers to find the perfect match for your home. With the right approach and a little patience, you can achieve a safe, beautiful result that lasts for years to come.
Frequently Asked Questions
Do I need an electrician to install a socket spacer?
You don't necessarily need an electrician to install a spacer, as it is considered a straightforward DIY task similar to replacing a faceplate. As long as you are confident and follow strict safety protocols, such as isolating the power at the consumer unit, you can complete the job yourself. However, if you discover damaged wiring or feel unsure about the connections, you should always consult a qualified professional.
Will a socket spacer fit any UK plug socket or light switch?
Most spacers are designed to fit standard British Standard 1-gang and 2-gang electrical fittings. Since UK backboxes have standardised screw centres, 60.3mm for singles and 120.6mm for doubles, a standard spacer will align with almost any regular faceplate. If you have non-standard designer plates or multi-gang switches, you might need a bespoke solution to ensure a perfect, flush fit against your wall.
What length of screws do I need when adding a 10mm spacer?
You will typically need M3.5 electrical screws that are at least 10mm longer than your original ones. If your current screws are the standard 25mm length, you'll likely require 35mm or 40mm versions to account for the thickness of the spacer. It is always better to have screws that are slightly too long, as they can usually be driven further into the backbox lugs without any issues.
Can I use a spacer on a tiled kitchen splashback?
Yes, spacers are an ideal solution for tiled splashbacks where the backbox has become recessed behind the new tile thickness. They provide a sturdy bridge between the box and the faceplate, which prevents the plate from bending or cracking the tiles when you tighten the screws. This is a very common way to add wiring space behind faceplate setups during a kitchen renovation or modernisation.
Are 3D printed socket spacers heat resistant and safe?
High-quality PLA spacers are safe for domestic use because they provide mechanical spacing rather than acting as a primary electrical insulator. Whilst they aren't designed to replace the fire-rated backbox itself, they are durable enough for the temperatures found behind a standard home outlet. To maintain safety, always ensure your wire connections are tight and that cables aren't being pinched, which prevents unnecessary heat build-up.
How do I hide the gap if my backbox is sitting wonky in the wall?
A socket spacer can help disguise a wonky or unevenly recessed backbox by providing a flat, level surface for the faceplate to sit against. Because the spacer rests on the wall surface rather than the lopsided box, it squares everything up. This hides the uneven gaps that usually appear behind the plate and gives your outlet a much straighter, more professional appearance without needing to re-plaster.
Can I paint my socket spacer to match my wall colour?
You can certainly paint PLA spacers if you want them to blend in perfectly with your specific decor. We recommend using a plastic-compatible primer first to ensure your topcoat adheres well to the surface. This customisation allows you to add wiring space behind faceplate fittings whilst maintaining a seamless look that matches your paintwork or wallpaper, making the practical fix almost invisible to the eye.
What happens if I crush the wires behind the faceplate?
Crushing wires leads to insulation failure, which significantly increases the risk of short circuits and electrical fires. Constant pressure causes the copper strands to fatigue and the protective plastic coating to split or thin out over time. Using a spacer ensures there is a generous cavity for the cables to sit naturally in a concertina fold, keeping your home safe and preventing hidden electrical faults.